I came home to a nice pile of boxes on 2/16. The season is quickly approaching, so it's getting down to crunch time. That being the case, it was time to get the trim pieces and other items to get the car looking complete.
As you're aware if you've been following along, the car came to me with a number of items missing from the front of the car. Since I'd also updated the car to the 2009+ look, the bumper was missing all of it's trim pieces such as the grill, foglight bezels, etc.
This pile of boxes included the grill, front fender liners, under engine tray, and all of the associated fasteners needed to install them. It's really amazing how all of these seemingly minutia pieces can add up in cost.
The stock foglight bezels really stick out on the car, and the side reflector is incorporated into the bezel. I had previously ordered these, but decided that for my purposes, they didn't really seem like they were going to work right for my application. While browsing images of MX-5 Cup cars, I noticed that they seemed to have a different bezel and found that they were brake ducts that could be purchased through Mazdaspeed. What I didn't realize at the time was how expensive they were. I had wrongly assumed that since the stock pieces were so cheap, that these couldn't be too bad. Well, this was a case of not asking before ordering. $200 later, they were on their way to me.... I was tempted to return them, but decided that ultimately they were really what I wanted, so in they went.
The ducts are made of fiberglass and have to be drilled and riveted to the car. Good thing I've gotten fairly comfortable with drilling into the car, as I had to drill holes into my beautifully painted bumper.... For the time being I will just run them as is. Eventually I'll probably add the hoses and backing plates to really use them for brake cooling. However, since it'll be awhile before I put the car on the track, I'm not that concerned about it right now.
The other thing I decided to do was to take advantage of the headlight openings for the intake. I had an AEM intake from my old CSP car that I had already installed. This intake was deemed not legal in CSP because of the need to remove a splash guard, but for DP that didn't matter. I figured that moving the filter to the passenger headlight opening would give it a cleaner air stream, so I ordered up a couple of rubber connector pieces and the associated clamps, along with a 2 foot long long piece of 3" aluminum tubing. After looking at the intake for awhile, I determined that if I planned my cut of the existing tubing correctly, I could get away with just adding about 6-8" of new tubing.
After temporarily mocking it all up, I then set about trying to use the existing attachment arms. Fortunately, those too were aluminum, so bending them to get them to where I wanted them was fairly easy. I was able to use both of the existing attachments but attaching them to the car in different places.
With just over a month before the first event, I've ordered the remaining three wheels from REAL Racing Wheel. These guys have been a big help in my endeavor to fit 16" wheels to the car. Not only do they build a great product, but their pricing, customer service, and build times are incredible in the custom wheel industry. Their normal turn around time is about a week and a half to two weeks. Their 16x10 wheels run about $365 each, which is a great price for a 3 piece aluminum wheel. Once my Motons show up, I'll get everything mounted up and post more pictures.
I'll also be ordering up some wheel spacers, sway bars, end links, race harness, shift knob, and a new seat mount and slider. With these items and a quality alignment from Fordahl Motorsports, the car should be ready for it's debut.
More later.
Sunday, February 27, 2011
Sunday, February 13, 2011
Test fitting new wheel
My updated wheel showed up with 7" of backspace instead of the previous 6". Again as noted before, spacers will be needed to clear the calipers, so it made sense to move the wheel inboard. I also had the center changed as you'll see in the pictures.
I had a tire mounted up and today I pulled the front and rear shock assemblies out to be able to lower the car to get an idea of how everything would look once the coilovers go in. Again, I only have one wheel right now, so I apologize for the inability to see the whole side with two wheels.
Studs, hubs, and paint (Originally posted 2/12/11)
I just noticed that my last update was way back on Christmas day....
Work has definitely not stopped during that time, and in fact there have been some really big updates.
Since it’s difficult to find specific information on what works/fits these cars, I’m going to be including part numbers where I can to help others in the future. It can be assumed that most numbers are Mazda part numbers.
First up, as noted previously, longer wheel studs needed to be done to fit the new wheels. I had a couple of different choices since I will need spacers to fit the wheels. First up would be the ARP studs that have a great reputation and the nice bullet noses. The second choice was to get the Ichiba wheel spacers that come with longer studs. The nice thing about the Ichiba spacers is that they are hub centric vs. normal spacers being more of a one size fits all. Initially I decided to just get regular Gorilla spacers and so I chose to go with the ARP studs. Again, they have a great track record (sorry for the unintentional pun there...) which was important to me. After a bit of research, I determined that the correct ARP part number was 100-7719 for the studs.
Since I was replacing the studs, I also ordered up the 2009+ RX-8 front hubs. The RX-8 reportedly has beefier hubs than the MX-5, so this was a no brainer. There are two different options for the hubs for the RX-8, one with DSC and one without. I had previously ordered the one without DSC since my car didn’t have it and I assumed that would be the correct part. As it turned out however, the ABS sensor mounting was incorrect on this one. The correct part number is F189-33-04X. I had already replaced the right front upright with the 2009+ MX-5 part, so I ordered one for the left also. The geometry had been updated on these newer ones to help with bump steer, especially when the car is lowered. This updated upright/steering knuckle is NH42-33-030.
To replace the rear studs, the hub would need to be pressed out of the carrier, so I also ordered new wheel bearings for the back. These are quite spendy, but now I have all new bearings front and rear, and as I found, these too are very beefy. The part number for these are is FB01-26-151E.
Pressing out the “old” studs in the front was easy since the hubs just bolt to the uprights, so there is easy access. The rears obviously are more challenging because of the need to press out the hub. Since my car is a full on dedicated race car, I didn’t want to keep the brake backing plates, so I also removed those. I cut them off prior to any of the press work which also made things easier when it came to pressing the bearings out and the new ones in.
The Gorilla spacers were out of stock when I ordered the studs, so now I'm rethinking what to do for spacers. I may get the Ichiba ones after all unless I can find something else hubcentric that isn't as expensive since I won't need the studs that come with the kit.
After the intial fittings of the wheel from Real Racing Wheel, I decided to send my wheel back to get the backspacing increased from the 6” I had initially ordered to 7”. I want to keep the wheels tucked in as much as possible, and with the need to run spacers to clear the brakes, I figured that it was easier to play with spacer thicknesses to get everything where I wanted it. I’m going to wait until I get the suspension on the car before doing all of the final measurements, but I’m thinking that I’ll probably go with 15mm spacers front and rear with the 7” backspace. The guys at Real were very accommodating in helping me with this. A big shout out to these guys!
The next big thing I needed to do was to refit the carbon fiber doors and get them aligned correctly. I also needed to figure out a way to secure them in the closed position that would allow for easy opening.
I’m keeping the stock hinges on the car, and the alignment is mostly determined by the way the hinges mount to the body of the car. The holes on the door side of the hinge are only big enough for the bolt. This required pulling the fenders to get at the bolts on the body side of the hinge. I was able to get most of the adjustment I needed by doing this, but the fine tuning required some grinding and dremeling… I ultimately had to grind down part of the lower hinge to allow the bottom of the door to tuck in like it should and also had to enlarge the lower hole. In stock form, each of the hinges has two bolts that go into the door. Since the carbon fiber doors are WAY lighter, I chose to only use the top and bottom bolts. Two bolts don’t really save much weight, but every little bit helps.
As for securing the doors, I had been thinking on this one for a few months. Early on I thought about going with the Aerocatch latches as those would allow me to open the doors from the outside and they would definitely have a cool factor. However after taking a closer look at the doors and the door frame, I decided that while it might be doable, it would take a lot of work. I finally got an “a-ha” moment while at work. I’m a UPS driver by trade, and while doing my morning pre-trip, it suddenly dawned on me that I could do something similar to the way the hoods are secured on our trucks. It’s a basic rubber strap hard mounted on the bumper with a ball at the other end that mounts into a receiver that’s attached to the hood. I went to Lowe’s (our local big home improvement store) to see if I could find something similar. It turned out that they didn’t have what I was looking for, but one of their associates suggested I try a 4 wheel drive place since Jeep Wranglers and some of the Range Rovers use something similar. Unfortunately it was late on a Saturday and we don’t have any 4 wheel drive places close. In explaining this to my wife, she suggested we try our local Arctic Cat/Kawasaki dealer since they were close by. That didn’t make much sense initially, but all the sudden a light bulb in my head went super white! During the winter months I spend a lot of weekends snowmobiling. For anyone that’s ridden a snowmobile, you know that the hoods on those are held down with a very similar setup to what I was thinking of. Why this hadn’t popped into my mind earlier, I don’t know. In any case, we hopped over there and explained what we were looking for to the parts guy and he brought out a few different options. One of them looked like it would work, so I purchased the parts for a whopping $15 and brought them home. I drilled a hole in the door frame for the fixed end and then drilled two holes into the door for the receiver bracket. I used rivnuts in the door to make the bracket easily removable, plus the rivnuts are probably a little stronger than using regular rivets.
Speaking of rivnuts, I’ve been using them a lot. The main thing I’ve used them for is the routing of the wiring. I was able to shorten a bunch of wires and reroute some to minimize the number of locations where I have wires running.
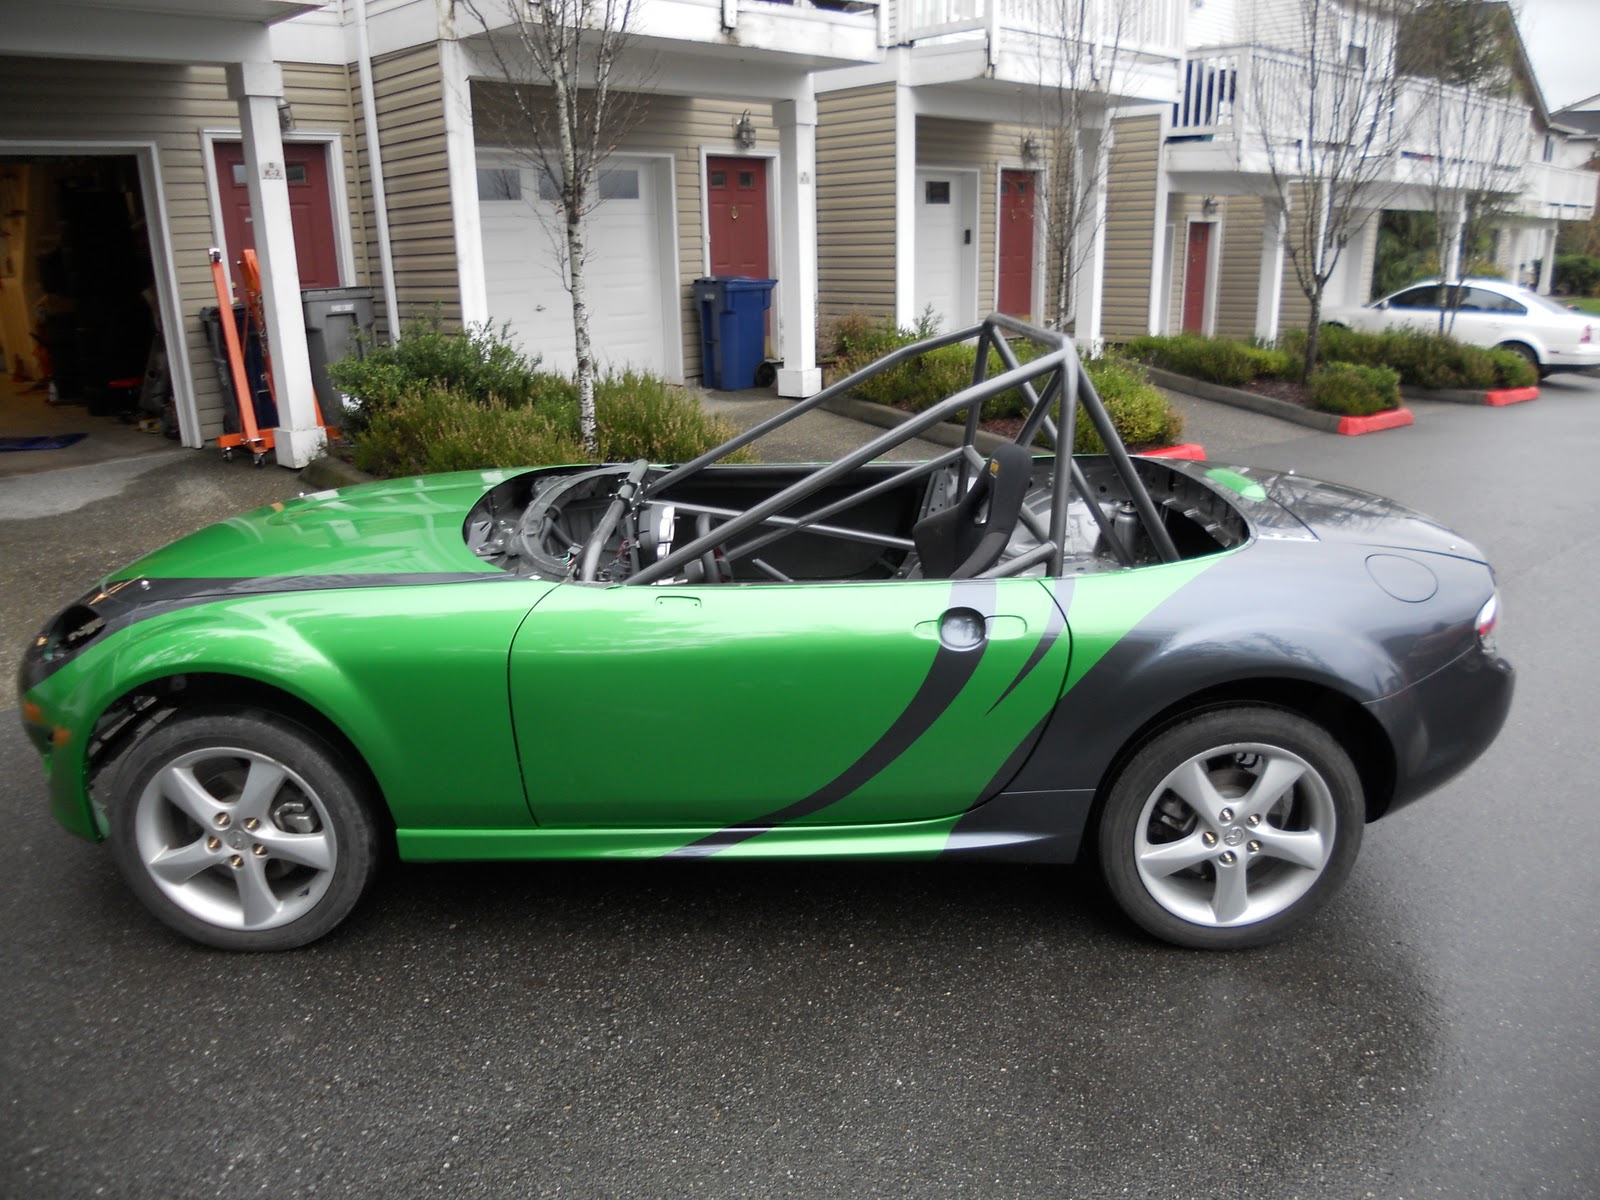
The coolest thing just happened this past Saturday though. We took the car in to Pacific Auto Body and got it painted. We went with a two color scheme utilizing some GM colors. The inspiration for the paint scheme came from a European race series. Initially when thinking of what color to paint the car, I had intended to just do a single color and then add graphics. I wasn’t sure what color I wanted until I saw a new Camaro in Synergy Green Metallic. At that moment, I knew that was the color for me, but for awhile had changed my mind and was thinking of going with Mexico Blue, which is a classic Porsche color. I was set to go with that, but then we attended the Seattle Auto Show, where they again had a Synergy Green Camaro. Sold!
After determining the paint scheme we wanted to go with, the next decision was what the second color would be. Since we were already using a Camaro color, I decided to see what gray colors were available on the Camaro/Corvette. I saw pictures of a few Corvettes in Cyber Gray Metallic and it looked like a great second color. We then went to our local dealer to see if they had touch up paint in the two colors. Unfortunately they didn’t. They did however have a Cyber Gray Corvette. Beautiful! As luck would have it, I went to another Mazda/Chevrolet dealer to look at MX-5s and the difference between stock and appearance package side skirts. Guess what was there? Two Camaros parked right next to each other, one in Synergy Green and one in Cyber Gray. That made the final decision easy.
Pacific Auto Body is a Seattle shop that specializes in BMW, Mercedes, and a number of other cars. They did an incredible job on our car, and I wouldn’t hesitate to send anyone there for paint and/or body work. A lot of work went into getting the car painted, as all of the existing paint had to be sanded down, the plastic rear bumper had to be specially treated to allow the paint to stick, etc.
The car was originally black, to which I added carbon fiber doors, a white front bumper, blue front fenders, a black primered rear quarter panel, and a black plastic rear bumper. Obviously a lot of different colors were going on. After sanding everything down and primering the carbon doors, a base coat of white was sprayed to allow the green to “pop” correctly. The car and parts were then masked to do the gray over the top. What you see is the finished product! Again, a big thanks go out to Pacific Auto Body, and especially Jerry and Kyle who did the work.
So that mostly catches us up. Next up is to get the suspension on the car, order up the other wheels, and get a few other items.
Talk soon.
16x10 REAL Racing wheel shows up! (Originally posted 12/25/10)
As promised, my wheel showed up today and I did an initial test fitting tonight when I got home from the requisite Christmas Eve family function.
The first thing I did when I pulled the wheel out of the box was to weigh the wheel. It seems a bit heavy at around 17 pounds, but is certainly robust. It's also a nice looking wheel.
I then took it down to the garage and pulled a front and rear wheel for initial fitting. As previously noted, the two original wheel makers I had talked to (Diamond Racing Wheels and Spinwerks) said their wheels wouldn't fit over the stock brakes, so this was my first concern. The other big concern was whether the wheel would fit over the lower link on the rear suspension.
I mounted the wheel first in the front. It definitely clears the calipers and seems to be a pretty good offset, however due to the shape of the center of the wheel, it will require a spacer of approximately 3/8" (5 mm) to clear the caliper carrier.
Next up I moved it to the rear. It bolted up and appeared to fit completely. However, once I took the e-brake off and tried to spin the wheel, I noticed that it didn't turn as well as it should. I got under the car and took a look at the brakes and the lower link and all of them had clearance. So, the only issue in the back is the same as the front where it will require a spacer, although it would only need a very minimal spacer in the back.
Again, the biggest issue I was concerned about was the lower link in the rear. Let's just say the clearance is tight.... There is only about 1/8" between the link and the wheel! The main thing though is that it does fit!
Next up, I'll have to get some spacers and obviously longer studs. I'll also get one of my tires mounted up and do further fitting to verify everything is good.
More later.
Tires for the Beast (Originally posted 11/13/10)
I picked up a used set of tires this morning for the car. The size I'll be running are 23.5x11x16 on 16x10 wheels.
So, I put them under the rear fenders and lowered the car down with the jack until suspension was resting on the tires. Hopefully I'll be able to lower the car even further once the suspension and wheels are on, but this is a good starting point for showing how much rubber will be under the car.
I also ordered up a new rear bumper from the '09 up cars so that the car will have the look of the newest version. BTW, if anyone has a '09 up and has a spare pair of stock sideskirts sitting around, let me know. I'm in need of those as well.
More weight loss and gauge panel (Originally posted 12/20/10)
As I noted in my last post, I was working on removing the sound deadening material from under the seats and on the rear deck. All in all, I pulled out around 4.5 - 5 pounds of material doing this. I thought about pulling out the stuff in the footwells, but because it was so thin and covering a number of overlapping panels, I decided that I'd just paint over that stuff.
The cage is now full painted in black Hammered, and I just finished painting the interior in grey Hammered.
I've also been continuing to work on the wiring in the car. During some slow time while I was waiting for paint to dry, I decided to get rid of the wiring in the front of the car for the headlights. It needed to be done, but what started as a nice "simple" idea turned out to be a LOT more. I decided that rather than just cutting the wiring out, I would pull out the pins at their origin. In most cases this was at the fuse block. Of course while I was in there, I couldn't stop at the part I was working on. Next thing I knew, I had pulled out a bunch of wiring. In the end, it's worth it to have simplified the system, along with taking away the worry of something shorting later because of cut wires. One of these days I’ll get around to weighing all of the wiring I’ve pulled.
Since the 2011 season will be here before I know, I'm starting to move to the more serious (read, expensive....) items. The two major items are wheels and suspension.
In my quest to find 16x10 wheels, I purchased a tool to help me determine the proper backspace for the car. The tool effectively allows you to see where there might be fitment issues as it attaches directly to the hub and can be rotated through the full arc. Using this, I determined that a 6" backspace would be a good starting point. Since I'm apparently the first to try to fit 16x10s, I wanted to order up a less expensive wheel to start with to make sure my measurements were all good.
Unfortunately, the first two companies I contacted told me their wheels wouldn't fit with that backspace. Apparently the drop centers wouldn't fit over the brakes with this offset. The second company said their wheel might fit with a 5" backspace. Moving the wheel out that far would not only probably require flares, but it also would create a rubbing problem with the seams at the back of the front fenders.
A couple of people recommended that I contact REAL Racing wheels. I checked out their website and talked to them and it sounds like their wheels should work. I have a wheel on it's way to me and should be here on Christmas Eve. My fingers are crossed that it will fit. Once I verify fitment, I'll get one of my tires mounted up to do the final verifications, and then can order up the remaining 3.
I'm also finalizing my research on suspension. At this point the front runners are AST and Moton. Both companies now offer double adjustable shocks without remote reservoirs at a lower price point. I've heard very good things about the ASTs and my previous experience with Motons on my CSP MX-5 was quite good. I should be making a decision in the next week or so on this.
In the meantime, I needed to put together a gauge panel of sorts for my ignition/start switch and the factory gauges. After mounting my new steering wheel (a 320mm no-name wheel,) I realized that my initial thought of just mounting the gauge cluster in more or less the stock spot wasn't going to work. First of all, one of the attachment points would have been to the cage. I soon realized however that using the tilt function caused a problem with the mounting to the cage. I also quickly realized that I couldn't properly see the gauges through the smaller wheel.
After moving the cluster around, I decided that just mounting to the new center panel I was planning to install was the best option. Eventually I'll hopefully be able to get rid of the stock cluster, but for now, I need to keep it for the car to run.
I'm reusing two of the holes in the transmission tunnel that the stock dash originally mounted to and then have purchased a couple of brackets from Longacre Racing that go around the front hoop of the cage for the upper mounting points of the panel. I used 1/16" aluminum angle to form the side brackets and then picked up some 1/8" ABS plastic for the panel. It measures 9.5x15.
I had previously purchased a rivnut set for a previous project so this seemed like a great opportunity to use this awesome stuff. For those that don't know what a rivnut is, it's very similar to a rivet. However, instead of the rivet going through both pieces that are being joined, the rivnut only goes into the back portion. The beauty of it is that the inside of the rivnut is threaded so that you can put a screw through the front portion to join it to the back piece.
Since this panel will probably need to come off at times, either for putting other gauges in or replacing it later with something cool like carbon fiber, I felt it was better to use the rivnuts instead of rivets. Not only is the ABS now screwed to the brackets, but the ignition/start switch and gauge cluster are screwed to the ABS. One other thing that I couldn't have planned better if I tried is that the brackets turned out to be the perfect width to still be able to plug the wiring into the back of the gauge cluster.
The first picture shows the left bracket with holes drilled for the rivnuts, while the right bracket has the rivnuts already installed. The second picture shows the the panel attached with the ignition/start switch already in place. You can see the rivnuts in place for the gauge cluster in this pic also. I mounted the cluster using three existing bolt holes. The final picture shows it installed. It doesn't look super cool, but it has to be in the car at this point and it's solidly mounted and in my field of vision.
The next update will hopefully have great news of the wheel/tire fitting the car! Stay tuned.
Saturday, February 12, 2011
Been awhile (Originally posted 10/26/10)
It's been awhile since my last post. I guess life has gotten in the way.
It's not to say I haven't been working on the car at all, just been slow going.
Since the last post:
- Got new set of carbon fiber doors and have them temporarily mounted. Still need to get a nice day on a weekend at home to pull the car out of the garage to hang them correctly. I still also need to figure out how I'm going to keep them closed.
- Picked up a front bumper cover from a 2010. Now I've got a white front on the already blue, black, and flat black car... The bumper was naked, being just the cover. So I've ordered up the brackets to hold it on and the foglight housing.
- I'm currently working on the removal of the sound deadening material that is under the seats and on the back deck. I've already done the back deck and passenger side, and am about half way through the driver's side. It started from my plan to paint the interior and not wanting to paint over it. As it turns out though, it's pulling out about 2 pounds per location. Not insubstantial in the grand scheme of things. The steps involved include - Using a scraper/putty knife to pry it out (this is slow and tedious!) - Go back over the area a second time with the scraper to get as many of the small chunks off - Finally go over the whole thing with Acetone to remove the remaining residue.
I'll try to post more this weekend
Subscribe to:
Posts (Atom)